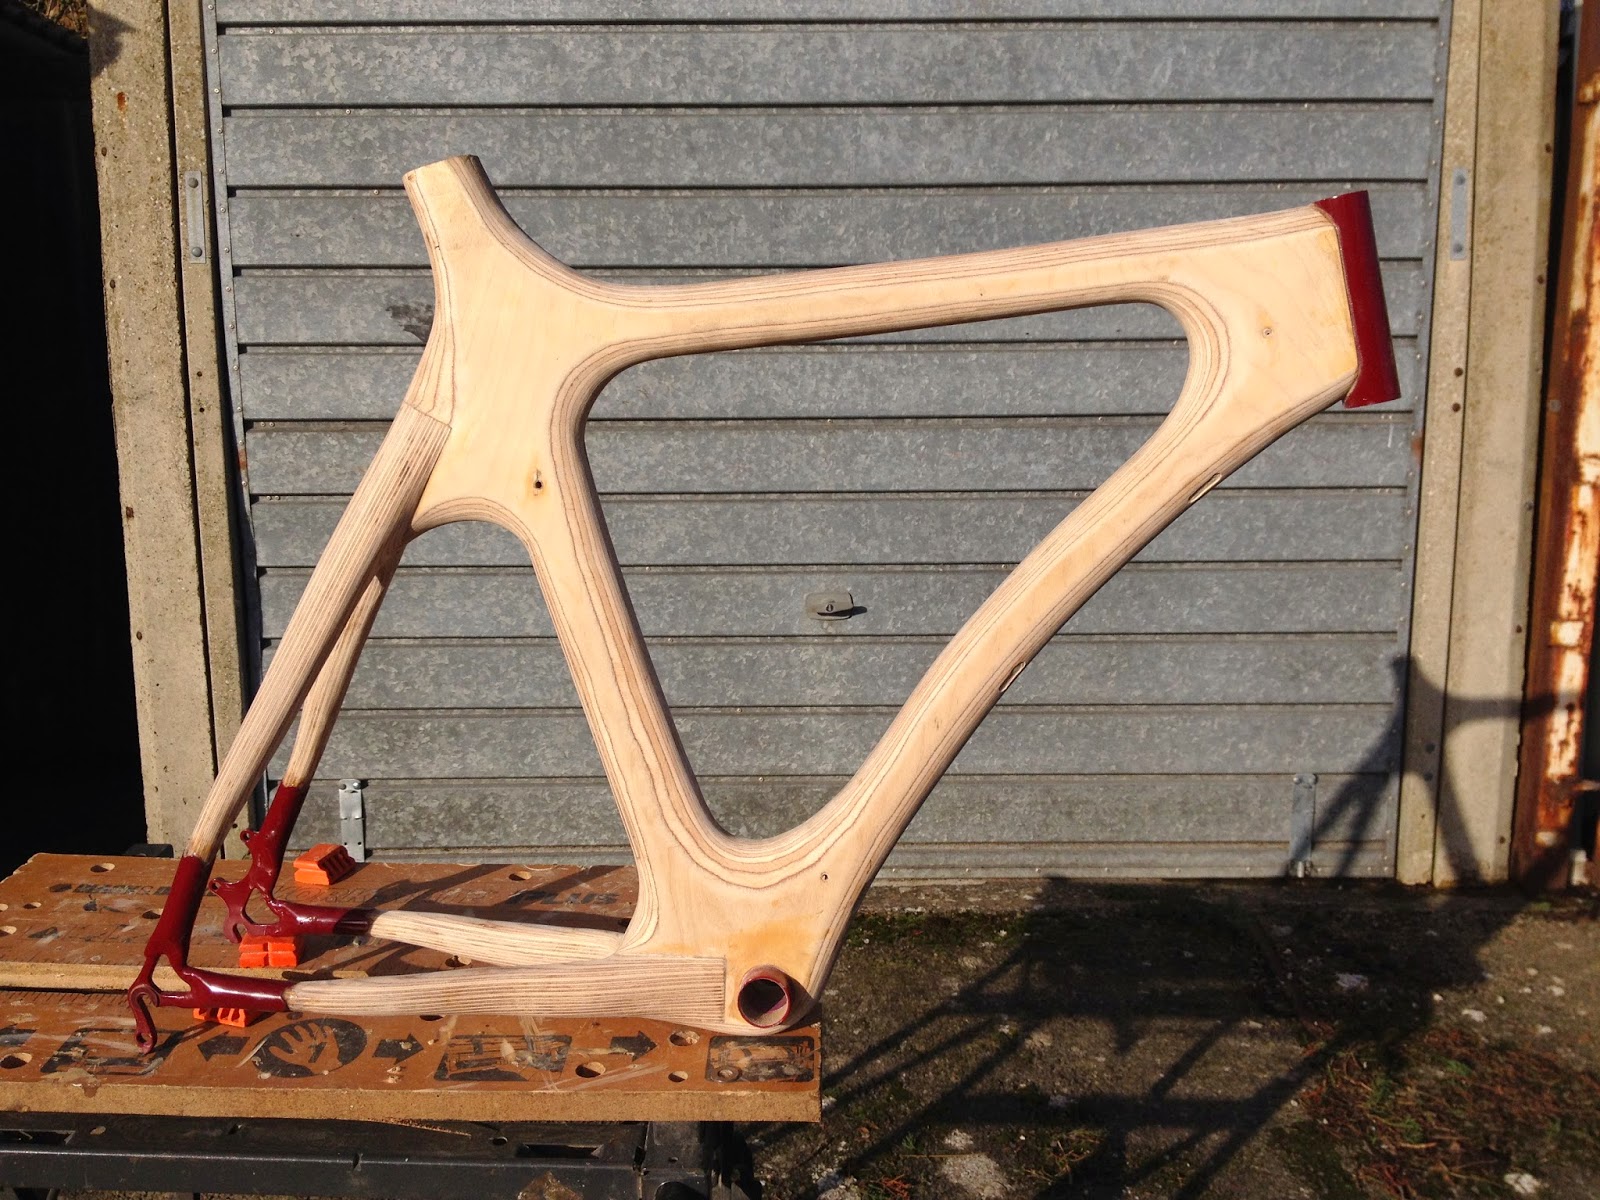
Have a look at the original Plycycle here .

28 July 2015

Varnish issues.

First, it has been a while, more real life has just got in the way....

Back in April I started lacquering the frame. The primer coat went on well as did the first coat. Then the problems started. When cured there were giant runs in the finish. I cut them off (yes they were that bad) and had another go. Again it looked good and smooth as it went on but when I came back the finish was terrible. I ended up pretty much sanding the whole frame back and starting again.

The second time it was July and hot. The varnish went on much more thinly out of the tin and cured faster. It was also well within the recommended temperature all night too. The finish was great, as it was on the Plycycle Mk1, and as I had expected it to be in the first place.

What I learnt was this. Do not rush it. The temp needed to be over 10 deg C. It was when I applied it but in the spring it went down much colder at night. This was not good. If I had actually bothered to think it through properly I would have worked it out and not made a LOT more work for myself.
Applying the lacquer at 22 deg C and an ambient temp of around 15 deg C at night meant that it was all good.

I should point out that my garage where I am doing the work does not have heating and I didn't want to leave an electric heater on over night in there unattended.

The varnish is OK now....

Anyway, the good news is that the frame is now sealed and looks great.

Next job is to fix the dings in the paint work on the metal parts.

8 May 2015

Wheels on.

It occurred to me this morning that I had not actually put the wheels on the frame for a very long time. So I did. See the pic below.
I have to be honest and say that I was disappointed, mainly with the forks and the impact they have. The front wheel has a super fat tyre fitted at the moment which it will not in the final assembly so ignore that. The main problem is the rake and size of the forks where it meats the head tube. Being aluminium the crown is very fat and really doesnt sit well by the steel head tube. I had thought that the chunky nature of the aluminium forks world work well, and they do to a certain extent but over all they just look a bit ridged compared to the rest of the frame. Also they are too long as they were intended for a 700c wheel, With the forks being too long it pushes the bike quite high, it was already a short high design, so this just pushes it a bit too far for my liking. There is a simple solution and that is to find a new set of forks. I think I will go for steel this time. I will look for a 26 inch fork that will fit the wheels properly and not push the geometry up. 


ThePlycycle Mk2 with wheels on.

As a result of fitting the back wheel found I had forgotten to carve out the frame where the rear wheel fits behind the bottom bracket. Or rather doesn't fit. I have to deflate the tyre to fit the wheel at the mo. it was on my list of things to do I just forgot. Luckily it is an easy fix, one i will ahve to do before i do the final varnish coats.

There has also been a tiny bit of warping in the frame, and i wonder if it has been because i didnt get it varnished before the winter. it has caused the rear wheel to not align as perfectly as It did when I set the drop outs. It is not a disaster, just disappointing.

On the plus side the first thinned coat of varnish looks good and holds promise for the next full coat.


27 April 2015

Varnish-first coat.

It seemed like a long way off for ages and now it is here it is a very exciting time in the project. Like many other stages this is a point of no return.
First coat of varnish. This first coat is thinned down 20% with thinners as a wetting/preparation coat. It may lift the wood grain in places, so it will need a good chack then light sanding before the final four coats go on.
I have chosen the same varnish as last time. It is a yacht deck varnish by Hemple. I chose it for its UV stability combined with strength and flexibility.
Having used it on the Plycycle Mk1 I am very happy with it. I like the high lacquer slightly orange finish it gives. It is not every bodies cup of tea, but I love it.

 
 First varnish coat going on.


You can see from the pictures how much the varnish brings out the shape and contours of the ply. This really changes the way the frame looks, for the better. It clearly looks wooden once the varnish is on.


Varnish first coat.

I just have to be patient now and varnish the frame carefully with out rushing, on days when the weather will be warm enough for it to cure properly.

Last bits done.

The tinkering and noodeling is over. I have finally got the frame to a place where I am happy. Today I spent some time giving the frame a final sand down. The frame has a nice shape to it now and if I carry on sanding any more there wont be any frame left. I have to draw a line under this somewhere and I am happy for it to be now.

I had been round in circles looking for a solution for the seat post fixing. I really didn't want to resort to inserting a metal tube into the frame. Possibly something i will regret if the seat post wears the hole wide with time. But if it does I can always sleeve it at a later date. Anyway, after a lot of hunting I found this seat bracket that has a lamp fitting machined from the same block as the clamp. If the clamp clamps the seat post directly which it does then all that remains is for the rotation of the seat in the hole to eliminated. The clamp will do exactly that once I have screwed it into the frame. Well that's the plan anyway.


 Seat post fixing solution.

 Rear stays.

Its ready for varnish.....


Final sanding video.

Next stop, varnishing.

5 January 2015

Refining the frame.

This is a fun bit but also a slow part of the build. Getting the shape to be the final shape. The main aim is to get rid of the excess epoxy, any staining that has occurred and to smooth out the lines and curves. Up until now the shapes have been very crude approximations of the final shape. Now I am loosing all the extra bits, lumps bumps and corners. It takes ages and I have to be patient.

Compare this with last time.....

A closer look with video.


There is still a way to go before it is ready for varnishing, but I am happy with the progress.

I still don't know how I am going to fix the seat post in. Latest thought is to chop off the riser and epoxy it in like last time, but that seems a bit defeatist, so I will try and figure a simple way to make it adjustable.

2 December 2014

It is a frame!

The frame is now structurally complete. I have finally bonded the rear stays into place. As winter has taken its grip I had to wait until there was a warmer day, over ten degrees in order for the epoxy to work properly. But in the end the day cooled off much faster than I had hoped and I ended up dashing into the house and digging out an electric heater from the loft in order to keep the garage warm. I didnt fancy keeping the heater on all night so after a couple of hours the epoxy had gone off enough for me to move the frame (carefully) into the house. By the morning it was cured.

Before i mixed up the epoxy, I did a final dry assembly to check wheel alignment and that everything still fitted, and made some last minute trims and tweaks. One of the main things I did was to drill lots of very shallow holes and rough up the contacts surfaces on the parts to be bonded. I also had to abraid the insides of the metal tubing on the drop outs.

Final dry run of rear stay positions.

The frame in one piece at last.


Video of the frame after the bonding.

This is a big step forward. There is still a lot of sanding and now that i see it all together there are elements of the frame shape that I will refine. The main observation is that I want to see more of the ply contours and that can only be achieved by working more curves into the shape. There are plenty of places to do this and I will just do it as I go, I feel like it needs to be an organic process. i just need to be careful as there is absolutely no undo option.
Right now, this frame is structurally ready to ride, from here on in it is all aesthetics. I feel like I should be getting the varnish ready.


17 November 2014

Painting the metal drop outs.

My pal Lew Gardener kindly brazed up the rear drop outs for me again having also done the brazing on the bottom brackets and head tube fixings. It is a tricky job as there is a big difference in thickness of the drop out and the tubes. Also the alignment of the tubing had to be good to my wooden frame and not necessarily square and as there was no jig to hold it all in place we resorted to the method we devised on the plycycle mk1. This involved me offering up the rear stays and fitting the wheel with it all essentially loose. Then when I was happy with the alignment I tacked the metal parts together with tiny dabs of a super strong epoxy. This held the pieces in place until Lew could tack weld the components then burn off the epoxy. Not ideal but it worked. We bolted the drop outs onto an old axle and surprisingly they lined up perfectly together, my frame turned out remarkably true.

Drop outs tacked and ready to braze.

Drop outs all brazed up.

Drop outs primed.

Drop outs all sprayed and lacquered.

 So the next stage is a big one. Fix the back end of the frame together. The end is in sight, after the final structural bonding there is final shaping and sanding, fitting the cable guides and finish the seat post fixing then I can varnish and fit components........ Ooooooh so close.


5 November 2014

Drilling and carving.

In order for the cable fixings to attach and bed into the frame properly I decided to carve out little trenches for them to sit in. I think it will look much nicer with them sitting flush with the wood and I also think that the strength of the bond will be much better. 
I tried hand carving with a chisels on a test piece of ply. It was fine when on the flat surface but carvin end on was a bit of a mess. I think my small chisel needs sharpening.... again. Anyway I found that my router has a blade that is a perfect fit and on the placements along the frame where there it is flat or convex I can rout out a good shape. The ones on the complex curves will have to be hand carved, once I have sharpened the chisel.

  Cable holder trench and test placement.

The other thing I have tackled recently is the seat post hole. On the Mk1 I really made a hash of the seat post, it was all on the wonk. Essentially because I rushed it. So this time I carefully set up my workbench and braced and clamped the frame making sure it was plum square with my small pillar drill rig. After lots of fiddling and checking I was ready.
I used a orger bit in a standard drill to get started. The bit worked a treat and once I got to the limit of the small pillar drill action I did the rest carefully by hand. I orger bit works best at a sower speed and with the straight hole established it didnt deviate as it is such a strong drill bit.
It got quite hot and I had to take it slowly, constantly clearing the chaff and letting the bit cool down. 


Drilling the seat post hole.


I would still like to have an adjustable seat but I am trying to figure out the best way to fasten it. At least I know it is straight this time and I can permanently fix it in if need be.


29 September 2014

Fiddly bits.

Along side building the main frame I have been gathering together all the components and additional bits that will need to come together to complete the bike. Wheels, gears and brakes will come from a donor bike. Seat, seat post, crank, bottom bracket head set and handlebars have been gathered together over the summer. In an ideal world I would love to fit it out with new parts but I am doing this on a budget of as little as possible. All these bits and bobs will come together once the frame is finished.

There are however some bits that are vital that need a little more thought. The cable routing and securing. In metal frame building they are called 'braze on's', the tiny parts that route the cables and the like. I cant braze these parts onto my frame so I needed another solution. I had thought about routing the cables through the frame, but decided not to for simplicites sake. So I needed to use a cable clip or bracket that would fix to the wooden frame.
I found a great selection of parts at Ceeway frame building supplies. I found two options so ordered both to test (and to fulfill their minimum order requirements) out mu options.

Here are the two options.
The two cable fixing options.

 I planned to silver solder on little stumps of metal bar that I would then epoxy into a pre drilled shallow hole in the frame. However after a couple of attempts I realized that it could potentially work but that I was over engineering the problem.

Failed silver soldering attempts.

Thinking it through I saw that I could use the hook type fixing by simply routing out a very shallow pit to match the shape of the base plate and simply epoxy the clip into the frame. This way the bracket would sit flush with the frame contour and was also thin enough to be slightly bent into and concave or convex profiles.
So I set about spraying them up. I lightly roughed up the surface with wet and dry paper, then super glued little a little leg onto each clip then pushed that into some plasticine for spraying. The little leg will snap off after spraying only leaving a tiny unpainted section that will be covered with epoxy once bonded.

Clips with primer coat.

Clips painted and lacquered.

Next step is to decide on the positions they will take on the main frame then rout / chisel out their pits.


18 September 2014

Bonding the main frame.

Like many of the steps in this project this bit was one was a one way journey, no going back. I had to join the two main halves of the frame together and bond the head tube and bottom bracket into place all in one go. There was no other way to do it.

So after an hour or so of checking and prepping all the contact surfaces, I started to mix the epoxy. There is something wonderfully focusing about mixing up the resin, the chemical reaction starts immediately and the clock is ticking. Despite having gone through the procedure a few times now, there is still a huge element of nerves and excitement.

So after wetting up the two sides of the frame and the two metal components with straight West System epoxy I added microfibers to the remaining mix and spread an even layer over one side, filling any dents or cavities along the way. It was then a case of marrying up the two halves using the registration bolts and gently clamping the whole lot making sure that even pressure was applied as far a possible and not too tight.


All clamped up.

Head tube and bottom bracket sticking out of the frame sandwich


All clamped up - video.

Having got it all clamped together I just had to wait. Twenty four hours later i took the clamps off, and it had all worked brilliantly. 

First look at frame with the clamps off -Video.


The good news is that it worked! I now have the main frame in one piece. I will have to be very careful about not knocking the head tube and bottom bracket as I cant take them out for repainting. The next step is to remove all the excess resin and get down to the final shaping of the main frame. I still have to epoxy in the rear stays and the reinforcing plat in the down tube which will all need cleaning up and refining once set.

I am considering making additional supports around the bottom bracket, i will mock some up and see what I think.


1 September 2014

Head tube fitting.

Getting the metal work to interface with the main plywood frame is critical and the latest step has been to get the head tube to fit. I had left the frame extra long at the front to allow me to change the fork angle. I offered up the forks with the wheel fitted and drew on the angle line I liked then simply cut the line with a chop saw. This gave me a good clean and true ninety degree cut.
Getting the correct curve inside the frame is tricky and I made a bit of a mess of it on the first Plycycle project where I tried to drill out the hole then cut it in half. This time I took a more measured and staged approach. First I  used a router to cut away the inside to a 'V' shape, then used a small one inch drum sander on my drill to get the curve. A rasp ironed out any lumps and bumps. It will need a bit of refining which I will do using a spare bit of head tube with sand paper wrapped around it which should create a tight fit.

Head tube first fit.

Head tube fit video.

However as I was working on the head tube I dropped it and put several large dents in the paint work which means I will have to rub it down and start again. It is not a big problem, more of a nuisance.

19 August 2014

Spray paint.

I took the opportunity to use the spray booth in the model shop at work to spray the head tube and bottom bracket. It has been a while since I had to do any proper spray painting and I didnt want to have to rub it down and start again because of drips. The lots of light layers on a solid primer is always the best way forward. The paint went on well. I then rubbed it down to prepare it for the lacquer. The lacquer needed a slightly heavier hand in order to create the smooth caot. My first tentative pass left a dinlpled finish. One of the model makers gave me some advice and I took it. More spray. Luckily it was still wet at this point and it took well. It is a fine line between having enough lacquer to get the smooth coat and too much a nd causing drips.


Luckily I got it right first time. Next stage is to get the head tube reamed and faced to fit the head set.